If you’ve read our beginners guide to astrophotography, you might be curious what it takes to do it yourself. Getting started as a serious astrophotographer begins with building your own portable rig. Typically, each rig will have the same basic components, built with your own personal preferences in brand and type of equipment, and it can easily cost $3,000 or more for a complete assembly with all of the astrophotography accessories. This guide will break down the anatomy of a standard astrophotography rig, from the top down, so that you can map out a plan and purchasing strategy as you build your own.
The Optical Assembly
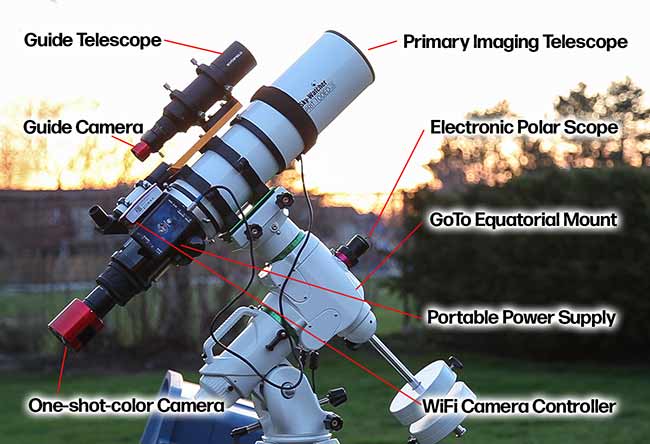
Guide Scope
Also called a Finder Scope, a Guide Scope works for seeking out your celestial targets and aligning your telescope to the celestial poles to enable tracking of deep sky objects. This is usually a small Refractor Telescope, of around 50mm-80mm and very light weight, which attaches to the top of your rig. Often, your Guide Scope might be the first telescope that you started your astronomy journey with, repurposed. The Guide Scope is provides visual communication to its connected Auto-Guider.
Autoguider
An Autoguider is secondary camera that functions as an automatic guidance system that attaches to your Guide Scope to ensure that your primary camera and telescope keep your celestial target centered in your sights. Ensuring precise targeting of your object by working alongside your Tracking Mount, an Autoguider helps to eliminate star trails and movement blur during long exposure shots. They also allow longer exposure times than your rig would otherwise be able to. Autoguiders typically cost anywhere from $150-$600, depending on quality, and come with software that controls the Autoguiding system, which runs on your laptop, connected via USB cables.
Primary Telescope
The Primary Telescope is the telescope that you use for imaging, and through which you will capture pictures with your camera. You will want to use either an Apochromatic or Achromatic Refractor, which is ideal for lunar and planetary imaging, or a Reflector Telescope for deep-sky objects such as galaxies and nebulae. Expect to spend anywhere from $500 to $3,000 on your Primary Telescope.
Dovetail Plate, Tube Rings, and Guide Rings
A Dovetail Plate is a metal bar that is used to attach your telescope to your mount, as well as any accessories such as your Guide Scope, and are designed to simplify the set-up and breakdown of your rig. There are two main Dovetail styles: the Vixen Dovetail, which is about 1.75” wide, and a Losmandy Dovetail, which has a width of 3”. Your Dovetail preference will be chosen based on the weight of your optical rig, and your mount should be able to accommodate wither style. Attached to your Dovetail Plate will be your Tube and Guide rings, which are cylindrical clamps designed to hold your Primary and Guide Scopes in place, respectively. Dovetail plates typically range between $50 and $150, while Tube and Guide Rings cost about $25-$50, although you might easily spend more than this.
Imaging Train
The Imaging Train is what collects light and brings it under control in order to form an image. Aside from your telescope, an Imaging Train is made up of a number of different components that work together to provide the clearest and brightest image possible, and the specific makeup of your Imaging Train might vary based on the type of image that you are aiming for.
Camera
Your Imaging Train runs from your telescope to your camera. There are two main types of cameras used in Astrophotography—the more traditional DSLR camera and the newer CCD camera. A DSLR camera is more versatile and allows for Terrestrial shoots as well as Planetary and Deep Sky imaging, while a CCD camera are considered dedicated astronomy cameras as they are designed specifically to function attached to your telescope. Either style of camera will work, however a DSLR is recommended for beginners, due to the versatility and ability to view an image directly from the digital screen, whereas a CCD camera will allow for more ease surrounding computer control. Expect to spend a couple hundred to a thousand on a decent astrophotography camera.
Secondary Focuser
While telescopes will come with their own Focusers, which allows image to be focused by adjusting your lenses in relation to your eyepiece, this is often one of the first pieces of your equipment that will be upgraded. There are three main types of Secondary Focusers: the Helical Focuser, which operates using rotational ring, a Rack and Pinion Focuser, which operates using wheels on either side of the focuser, and a Crayford Focuser, which is an amalgamation of both designs. In recent years, the Crayford design has become the most popular, as it solves some of the slippage and tightness problems that tend to manifest in earlier designs. There are also Auto-Focusers that apply computer software to automatically focus based on conditionals you determine, such as changes in temperature, or can be set to refocus based on a timer. Secondary Focusers can range anywhere from $80-$500 depending on the diameter and type.
Field Flattener and Focal Reducers
Field Flatteners are additional lenses that are quite expensive, often ranging between $300 and $600, but are essential for astrophotography. This is because telescope lenses create an effect called Field Curvature, where the focal plane curves toward the outer perimeter. Field Curvature created an effect that is known as Coma, or stretched and distorted points on the outer edge of the focal plane. Field Flatteners work to even out the Focal Plane, removing the distortion, and flattening the image across the entire field of view. Most Field Flattener also double as Focal Reducers, which focus the light received in the Imaging Train to a more condensed point to bring it more in light with the imaging sensor within your camera, which creates a brighter image.
T-Mount System
The T-Mount system is necessary to mount your DSLR camera and telescope together into one sturdy assembly. The system is made up of two components, the T-Adaptor and the T-Rings, which joins your camera, your lenses, and your telescope. The T-Ring is fitted onto your camera, and threads into the T-Adaptor, which is fitted to your telescope. A T-Mount system typically costs around $50, and is made at specific metric diameters that must match the size of your camera.
The Support Structure
Equatorial Mount and Tripod
Your Mount and Tripod are probably the most important part of your rig, aside from your Primary Telescope, and serve to not only support your Optical Assembly but to provide stable footing for the entirety of you rig. A general rule of thumb is that you want the payload of your Optical Assembly to add up to no more than 65% of your Support Structure’s maximum payload, in order to leave room for your counterweight. You don’t want to skimp on either your Tripod or your Mount, and expect to invest as much on this equipment as you would for your Primary Telescope, so expect to spend at least a couple hundred to a thousand dollars here.
An Equatorial Mount is designed to compensate for the rotation of the Earth, by aligning its rotational axis with that of the Earth’s equatorial axis, and as such it works in conjunction with your Autoguider to keep your targets centered in your field of view and minimize any chance of star trails. German Equatorial Mounts are the most common, as they allow mechanized rotation on two different axes—the Right Ascension Axis and the Declination Axis. The Right Ascension Axis functions to track the Earth’s longitudinal rotation, while the Declination Axis functions to track a celestial object’s angular distance from the celestial equator. In order to ensure proper functioning of your Equatorial Mount, it will need to be aligned and calibrated to the nearest celestial pole, either the North Star for those in the Northern Hemisphere, or the Southern Cross for those in the Southern Hemisphere.
Your Tripod is an important piece of equipment, as it keeps the entirety of your rig sturdy. As your Mounts works to rotate your Optical Assemble, a poor tripod will be subject to movement due to the shifting of weight. Because of this you want your rig reinforced by a tripod that will be able to compensate for and support the weight of your Optical Assembly and Mount, otherwise you might find the efforts to eliminate start trails and motion blur have been compromised by a piece of cheap equipment. When comparing Tripods, it would be best to look for a carbon-fiber construction, which, while more expensive, is lighter than some other materials while still providing for maximum stability.
Counterweight
Your Counterweight works to balance the weight of your Optical Assembly. This is needed because your Mount is tilted to match the angle of your latitude, which causes and uneven distribution of weight as your mount rotates and succumbs to the natural forces of gravity. Your counterweight should match, as exact as possible, the weight of your Optical Assembly. An improperly balanced rig will put unnecessary work on your Mount’s axes motors, increasing the amount of wear and tear that they experience, and thus decreasing their functional lifetime. Not only do you increase the life of your equipment by properly balancing it, you also make long-exposure shots easier by allowing your Optical Assembly to stay in place exactly where you’ve focused it.
Laptop
Your laptop will function as the central hub, or brain, of your rig and can allow you to control your rig with a simple mouse click. It can run the software for your Autoguider, drive your Equatorial Mount, process and store your photos, and any additional software such as digital star maps and a planesphere, as well as many other functions. Fortunately, you do not need a state of the art laptop to run your rig. You will need a laptop with plenty of USB connections, a minimum of about 4GB of RAM, and a hard drive with at least 250GB. A laptop equipped with Windows will also get you further than a Mac, as a vast majority of astrophotography programs are designed for Windows.
Power Supply
There are quite a few components to an astrophotography rig that require power, such as your Autoguider, your Equatorial Mount, you Laptop, and many of the accessories you might purchase. As most of the work of astrophotography takes place away from any sources of power because of the negative impacts of light pollution, you need to be prepared with a portable power supply that will provide the energy needs of your rig. While there are a number of options for power supplies, including car batteries, generators, and homemade alternatives, the most recommended power supply is a Deep Cycle Marine Battery. These are designed to tolerate the number of repeated discharges that a typical night of astrophotography requires, and they are much more physically resilient in their construction. Look for Deep-Cycle batter capable of around 100 amp hours, as well as a charger, which together will cost around $100-$200.